
Introduction
In this article we are going to build a fast one-shot recon script to collect the bulk of the information we need to serve as a starting point for our bug bounty testing. This blog post is complementary to the article on building an attack surface monitoring solution.

Automation, Computers vs Humans
There are a lot of disagreements on the topic of automation, as humans can see or correct things that computers would overlook unless explicitly programmed to do so. Recursion inside of scripts and careful design can help mitigate this, however, it is a complex task (and not necessarily desirable) to build a 100% automated testing framework.
Instead, many of the top application security testers and bug bounty hunters take advantage of the power of human-aided automation. Human-aided automation is where one is intellectually honest about the state of AI/ML in the current day, and builds a framework in a way that compliments both the strengths and weaknesses of computers and humans accordingly.
Building the script
1. The Skeleton
To begin the development of the script, we’re going to first build the skeleton. The skeleton will enable us to insert our code-logic in a modular way as well as take care of the file and directory organization. This is important to do first because as we test this script again and again it will soon make our project very messy.

Now edit scan.sh: and build your skeleton, this should:
- read and check that a valid scope directory exists
- create directories such as the scan directory for each scan
- calculate how long the scan took
- notify the user that the scan is done
vim scan.sh
Lets run the script by specifying the target ID as our only argument
./scan.sh example
Run this script several times and you will notice that for each scan, a new directory will be created. This makes it easy to perform differential checks from scan to scan and to organize our results.
Now that we have a solid skeleton, let’s get to work on the actual logic of the script!
2. Asset Discovery
Asset discovery often requires a human to review the information, this step may be lightly automated using a tool such as Uncover and the Whoxy API. For the purposes of this article, as this requires a lot of human analysis, we are going to leave this step as manual.
Root Domains
The first step in reconnaissance is asset discovery. Start by identifying what companies you would like to define as in-scope and obtain as many root domains as possible. A useful site for this is whoxy.com

Censys / Shodan
Search for the Company Common Name on Censys or Shodan and you may identify IP addresses of assets that do not have existing DNS records.

Perform reverse DNS lookups on the IP’s you discover through these search engines and see if you can identify IPs, ASN’s, root domains, or other unlinked company owned assets.
3. Subdomain Enumeration
Once you have gathered a list of your root domains, it is time to perform subdomain enumeration. Subdomain enumeration is the process of identifying valid subdomains (e.g test.example.com) from a given root domain (example.com).
DNS Bruteforcing
The first and oldest technique is DNS bruteforcing. DNS Bruteforcing has become exponentially faster than previous years. My go-to tools for DNS bruteforcing are puredns or shuffledns.
Shuffledns is a Golang wrapper for Massdns and makes it extremely easy to perform DNS bruteforcing at very high speed.
We will need two pre-requisites for massdns to function, namely a wordlist for bruteforcing and a DNS resolvers wordlist.
To prepare for shuffledns, we’re going to grab some of my favourite wordlists for bruteforcing. I built the pry-dns.txt wordlist with a combination of popular subdomains from my database as well as a combination of some of the common DNS wordlists from seclists. We will also download a resolvers wordlist that I have tested with low false positive results.

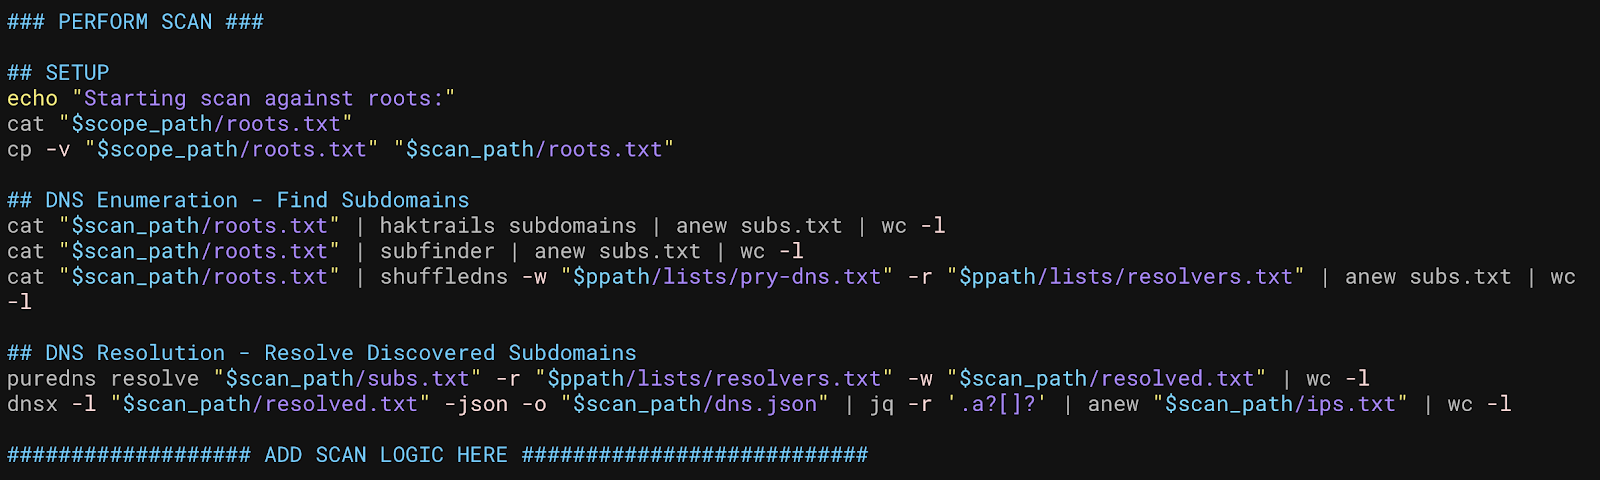
We will add subfinder and shuffledns as our first two functions.

Let’s run our script and see if everything works.
First subfinder will be ran:

Followed by a shuffledns brute force, this second function will take a bit longer and will depend heavily on the connection of the box that is running the scan.

And now our scan is done, it took 3 minutes!

If we run tree, we can see that it has created another file for this scan, subs.txt. We were able to discover 28711 subdomains.

This is a good start, however, we need to account for wildcard DNS records. Wildcard DNS is when a subdomain path on a domain will always resolve to the same preset IP address. For example:
A wildcard record may exist for: *.api.example.com
As such, anything.api.example.com will resolve to the same addresses. This can lead to false positives or lead to us discovering subdomains that don't really exist, potentially wasting our time. To remedy this, we can use the awesome wildcard detection that comes with Puredns.
To test this, we’re going to run puredns resolve on our existing subs domains.

As you can see, we discovered a single wildcard root, *.signon.aws.amazon.com. Resolution and filtering of wildcards allowed us to reduce our list to 12039!
We are going to add some more passive sources to our script, and then we should end up with something like this:
If we run this scan with these added functions, it should generate the following files:
- dns.json
- ips.txt
- resolved.txt
- roots.txt
- subs.txt
In the next section, we will explore using these files to further enumerate.

4. HTTP Server Enumeration
In the next stage, we will make use of nmap to scan the IPs that we have discovered through resolution of the discovered subdomains.
If we want to just discover HTTP servers from the Nmap results, we can do that using an nmap parser, such as nmaptocsv. I have faced this particular issue myself so I built a handy tool called “tew”. Tew is built in Golang, which means it can be compiled to binary and ran on many different systems without any dependencies.
tew -x nmap.xml
tew -x nmap.xml | httpx
5. Solving the Vhosting Problem
The above solution works fine for enumeration as long as you can be confident that your target is not implementing vhosting. To solve this issue, I added a —vhost flag to tew which allows it to import DNS data from DNSx JSON output and resolve them accordingly.
tew -x nmap.xml -dnsx dns.json —vhost | httpx -json -o http.json
As you can see, the hostnames from our DNSx output have been automatically resolved to the IP addresses and open ports from our Nmap XML output file.
In the above screenshot, we’re not outputting to JSON for readability purposes, however, once we save our HTTPx output into JSON format, we will need to extract the HTTP URLs with the below jq one liner.
cat http.json | jq -r ‘.url’ | sed -e ‘s/:80$//g’ -e ‘s/:443$//g’ | anew http.txtIn this section, we use sed to remove the port numbers for 80 and 443 as it can affect the efficacy of some tools due to servers responding differently than without port numbers such as redirecting.
Our one shot script is coming along nicely! Our scan functions should look like the following:

6. HTTP Crawling
The next piece of our script will be crawling our discovered URLs. We can process these using ffuf later to match a regex.
We will be using Gospider for crawling, however, we could easily use something else such as hakrawler or xnLinkFinder.
gospider -S http.txt —json | grep “{” | jq -r ‘.output’
7. HTTP Response capture
Inspired by Tomnomnom, capturing the HTTP responses from HTTP index pages can serve as a good starting point for hunting. Originally, we would use a tool like Meg to complete this. However, HTTPx incorporates this feature and we can modify our script to store responses as it performs its enumeration.

This will create a directory called “responses”. Inside, will be all of the HTTP responses.

If we take a look inside of these files, we can see everything including the response headers. We are at liberty now to grep and examine these responses and see if they contain anything interesting.

After updating our scan script, our scan functions should look like this:

8. Javascript Scraping
In the last step, we learned how to store responses using HTTPx to files. We can apply this same principle to quickly download javascript files.
cat crawl.txt | grep “\.js” | httpx -sr -srd js 
Now that we have a directory full of javascript files, we can explore these using grep or trufflehog.
Our enumeration script is ready! This is how the scan function should look:

Let’s run the script with a new target and move onto how to explore the collected data and some tricks for finding starting points.
Exploring the collected data
After our scan is complete, we will see some files generated akin to the following:

Using these files, lets explore how we can parse and read this data to find interesting starting points.
Hack like Tomnomnom
A little while ago, I watched a video by STOK featuring Tomnomnom (Tom Hudson) where Tom went through some of the methods he used to perform reconnaissance. This opened my mind a great deal and I will cover some of those methods here. This article is also a helpful reference: https://mavericknerd.github.io/knowledgebase/tomnomnom/session1/
https://tomnomnom.com/talks/wwwww.pdf
vimprev
Using a tool called vimprev, using vim, we can quickly flick between files in a directory. Add the following to ~/.vimrc
" Open word under cursor as ctag in new tab
map <C-\> :tab split<CR>:exec("tag ".expand("<cword>"))<CR>

if $VIMENV == 'talk'
  set background=light
  let g:solarized_termcolors=256
  colo solarized
  noremap <Space> :n<CR>
  noremap <Backspace> :N<CR>
else
  " Trans background
  hi Normal ctermbg=none
  hi NonText ctermbg=none
endif

if $VIMENV == 'prev'
  noremap <Space> :n<CR>
  noremap <Backspace> :N<CR>
  noremap <C-D> :call delete(expand('%')) <bar> argdelete % <bar> bdelete<CR>
  set noswapfile
endif

#/usr/bin/vimprev
#!/bin/bash

VIMENV=prev vim $@
Once setup, while in the responses directory, simply type:
vimprev $(find -type f)This will launch vim and load the first file in the buffer. Using the spacebar and the backspace key, it is possible to move through each file in the directory. You can also hold down either of these keys and it will move quite fast.
grep
The tried and true method of exploring data responses is through grep, grep for things you may find interesting, you can find keywords to grep for by using a tool such as tok along with sort.
To recursively grep through your data, the following grep command will show line numbers and filenames as well as be case insensitive.
grep -Hrni ‘set-cookie’ —-color=always | batcat
gf
It can be tricky to remember all the regex patterns for everything. This is what gf is for. Gf allows you to define your grep patterns in JSON files and refer to them with an alias. A list of example rules can be found here: https://github.com/tomnomnom/gf/tree/master/examples
Using gf, search for AWS keys inside responses:
gf aws-keystok
To find further starting points for enumeration, use tok.
Tok is a hugely powerful tokenizer tool, this means that it extracts words from given files and removes special characters and spaces.
find -type f | tok | sort | uniq -c | sort -rn | head -n 40
Using the above one-liner, we extract all the words from the HTTP responses we stored earlier and we sort them in ascending order of frequency of occurrence. It might make sense to pipe this output into vim for further analysis.
These words can be added to a wordlist for further enumeration, or grepped for to identify context.
find -type f | tok | sort -u -V | vim -
qsreplace + ffuf
Using qsreplace and ffuf, we can look for vulnerabilities such as path traversal or SQL Injection vulnerabilities. Simply set qsreplace to your payload of choice and then set the regex match (-mr ‘REGEX’) to a relevent regex.
function fuzz() {
	payload=“$1”
	regex=“$2”

	cat crawl.txt | grep “?” | qsreplace “$payload” | ffuf -u “FUZZ” -w - -mr “$REGEX”
}

fuzz “../../../../etc/passwd” “^root:”

# Or:

cat crawl.txt | grep "?" | qsreplace ../../../../etc/passwd | ffuf -u 'FUZZ' -w - -mr '^root:'

Conclusion
In this article, we have built a performant and useful one-shot recon script for bug bounty reconnaissance. This script is a useful skeleton to build your own reconnaissance script. Feel free to fork this repository and modify it until it meets your needs.
If you found this article helpful, please share this post and share the knowledge!
- Ben Bidmead, @pry0cc